Metal Pillar Molds: Getting Started

Molded pillars are one of the most common types of candles that are being made in the market. To keep it exciting, there are many different shapes and sizes available to choose from. Aside from the different shapes and sizes, the molds are fabricated out sheet metal, aluminum, and even some are made of plastic, latex, or silicone. The largest selection is typically available in sheet metal. Sheet metal and aluminum molds are generally very durable and should last for years with very little maintenance.
The instructions presented here will utilize a mold that is fabricated from sheet metal. However, the procedure for aluminum molds is very similar.
What you will need:
Wax with any desired additives such as dye, fragrance oil, etc.
Metal pillar mold
Wick
Wick Screw
Wick Rod (or wooden skewer)
Mold Sealer PuttyStep
1) Start Melting Wax.
You should be able to review and carryout these instructions while your wax is melting (refer to double boiler instructions). Before continuing, set up a double boiler to melt your wax.
2. Metal Pillar Molds:
Pass Wick Through Wick Hole
Select a wick of the proper size for the diameter of the mold you are working with. Thread the wick through the wick-hole in the base of the mold. Pass the wick through the wick hole. This should be pretty self explanitory.
TIP: If it is difficult to get the wick through the hole because it is frayed, try dipping the end in some molten wax and rolling it through your fingers to form a nice pointed end.
3. Metal Pillar Molds:
Secure Wick to Wick Rod
While keeping the wick within the wick-hole, tie one end of the wick to the wick rod. In the photo above, we have used a wooden skewer. However, the function is pretty much the same.
4. Metal Pillar Molds: Secure Wick to Wick Hole
Secure the wick with a wick screw. You will need a Phillips screwdriver for the wick screw. Do not over-tighten the wick screw as it may cut the wick or damage your mold. The purpose of the wick screw is to simply keep the wick from sliding back through the hole, not to seal the hole (we use mold sealer for that). Your wick should be taught, but do not tighten to the point were it will cause the mold to warp. Trim the wick leaving about 1/2 to 1 inch of wick. Scissors or diagonal cutters work well for this.
5. Metal Pillar Molds: Seal Wick HoleSeal the wick hole.
Using some mold sealer, seal the wick hole, wick screw and wick. This is to prevent leakage of molten wax. Press the sealer firmly into place to ensure a tight seal. It may help to lightly wind the wick around the screw before applying sealer. You don't want to be able to see any wick.
6. Metal Pillar Molds: Initial Pour

Once your wax has reached the proper temperature (175-185 deg. F. for most pillars), add your additives (if any), your fragrance oil, and dyes to the wax in the pouring pot and mix well using something such as an old wooden spoon. Once it is thoroughly mixed, and is at the proper temperature, pour the wax into your prepared mold. Have an old towel or some paper towels handy to catch any spills that may occur. Fill your mold to about 1/2" from the top of the mold. Leave some wax in the pouring pot for a later stage, but do not return it to the heat source yet.
7. Metal Pillar Molds:
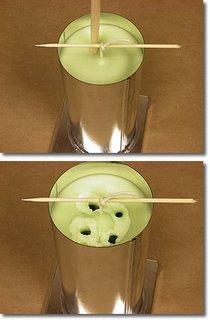
Poke Relief Holes Allow to cool a bit until a surface has formed on your wax. At this point poke relief holes into the base of the candle to accommodate the natural shrinkage that will occur as the wax solidifies. The relief holes should be positioned around the wick as shown and should be poked to a depth of about 1 inch less than the depth of the candle. The exact number of holes is not important. The important point here is to provide a vent by which the contracting volume of wax can suck air through to make up for the decreased volume. Without these relief holes, you may get air cavities within the candle, the wick may get pulled off-center, or the external walls of the candle may become deformed.
You may need to poke relief holes several times during the cooling process to ensure that the vent remains open and clear.
Allow the candle to cool completely to room temperature before proceeding to the next step. This cooling process may take several hours. On very large candles, it may take in excess of a full day.
8. Metal Pillar Molds: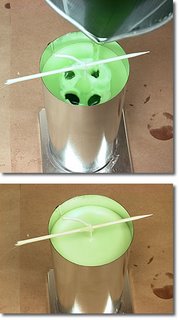
Re-Pour Re-melt the leftover wax from step 6. This time you will want the temperature to be about 5-10° hotter than the original pouring temperature. The hotter temperature aids adhesion between layers. Once, your wax is at the proper temperature, fill the sinkhole in your candle. Fill to a level just below the level of the first filling. Filling higher than this may cause a horizontal seam line to be visible on the exterior of your finished candle. Overfilling may also cause wax to seep down between the mold and the candle, resulting in an unsightly finish.
Allow the candle to cool completely before proceeding to the next step
9. Metal Pillar Molds: Remove Candle From Mold
Remove Candle From Mold. Remove the mold sealer and the wick screw. If cooled completely, your candle should slide out of the mold. If it does not slide out easily, then place the candle in a refrigerator for a period of about 15 minutes, then try again. The cooling will help the wax shrink even more and help it separate from the mold.
The end of the candle attached to the wick-rod is the bottom of the candle. Trim the wick on this end with a pair of scissors or diagonal cutters. You will want to trim the wick flush with the base of the candle.
If desired, you may level the base of the candle by placing the candle on a cookie sheet (one with sides will work best) that is sitting atop a pot of boiling water. Use the heated cookie sheet to melt away some of the wax until you have a flat base.
Trim the top wick (not shown here) to about 1/4."
10. Metal Pillar Molds: Enjoy

Enjoy. Your candle is now finished and ready to be burned.
Burn pillars only on a designated candle holder. Avoid drafts. Keep away from children and pets. Never leave a burning candle unattended.